Using custom Java code mapping in Mule CE

Congratulations, you’ve finished your Mule training and received your certification. Your dev lead informs you that your next Mule project won’t be using Mule Enterprise Edition, which means no access to major Dataweave features! How will you map, transform, filter, merge data without Dataweave? Read on to learn how we build mappings on Mule Community Edition without using the Transform Message processor.
Generate Source and Target Java Classes
To begin, we need to form the java classes for the input and output XML messages. (This step corresponds to defining the input and output metadata in Mule’s transform message processor.) If your schema files are XSDs, make all the referenced schema files are in the same folder. Using the command-line in the directory where your XSD schema files are, execute the command xjc <filename>. The java classes for your schema will be generated in the same directory. Copy these to your mule src/main/java folder and refactor package name as necessary.
If your schema files are WSDLs you can use the same command with a -wsdl parameter to generate the java classes. For JSON messages, you will need to utilize an external solution (such as IntelliJ IDEA, or one of the many available online converters) to generate the classes.
Implement the Mapping
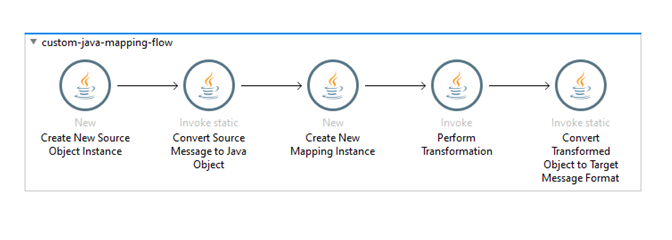
On the Mule Palette, import the Java module, then look at the flow image to see the five steps of implementing a mapping.
- Create a new Java object. The first processor is to create the java object instance for your input message. Set the class and constructor fields as the class of the root element of your input message, and in the Advanced tab, define the target as a variable.
- Populate the source message object. The second processor is to “unwrap” the payload (input message) into the object instance (which we have set as a mule variable). For this, we need to import a JAXBHelper class library into the mule project. Use the appropriate class and method for the input message format from this JAXBHelper library. For example, if your input message is an XML document, use the
fromXmlmethod. Set the arguments so that the input stream is the payload, and the target object is the variable set in the previous step. - Create the instance of the mapping class. Create a new java class file within the src/main/java directory of the project. This is where the custom mapping code will be written. Set the class and constructor in this processor to the class just created. The processor’s target can be set as the payload or a new variable, making sure the same target is used as the instance in the next step.
- Invoke your custom transform method. In the mapping class that you have created call on method you created in your transform class. You can use the arguments field to import other Mule variables into your custom mapping code. Set the target of this processor as a new variable.
- Generate the output message. Finally, with the help of the JAXBHelper class, “wrap” the mapped object into the format of the output message. For example, use the
toXmlmethod if your output message format is XML.
Reuse the Mapping Pattern
Once completed, this five element subflow will become your Transform Message processor in Mule CE. This technique gives you significant versatility for mapping, as you are not limited to only Dataweave functions, and can utilize any Java code inside your mapping. Using Java mapping classes makes it possible to implement complex requirements such as N-to-1, 1-to-N mapping, split or aggregate sources, and message filtering, all without using Dataweave.
When writing your custom mapping class, you can utilize Anypoint Studio as your Java IDE. It has all the standard IDE features you would expect from Eclipse. This way, you don’t need to leave the studio when building your mappings.